It was still morning when I arrived at my desk yesterday and the first thing I did was pick up the workbook I’d deliberately left there the night before and start to leaf through it. Then I got out my coloured pens and started to complete it in more detail. Read about what I was doing below.
I started today’s blog post and then broke for something to eat. Over dinner I caught up on blogs, updated the diary, and entered some competitions. The week was finally warming up…
Next up, I revived the two word-count spreadsheets and updated those for what’s left of March. Then I switched everything off and took the proofreading into another room where I wouldn’t be distracted.
Camp NaNo
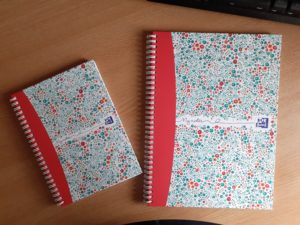
I’m delighted to say that prep work continuation has begun for Camp NaNoWriMo April 2023. The picture above is of the two workbooks I’ll be using. The A5 book on the left has all of the planning notes in. The A4 book on the right will be where draft 1 will be written. This is a different draft to the one I already wrote back in 2021 for NaNoWriMo.
Planning notes
For years I’ve been doing all of my planning work inside Scrivener, but this year I’m going back to basics and doing it by hand first, so I can take the workbooks anywhere with me and work on them any time I want to. At the moment, the only book I’m taking everywhere is the A5 planning book.
I also have a slim pencil case that the poet treated me to that contains all of the different coloured pens I’m using, a pencil, and a small 6″ ruler (or rule, as he so often corrects me – a ruler is a person, but to Brummies, like me, it’s also a straight edge with inches marked on one side and centimetres marked on the other). There’s also a comb in there, a tube of Blistex (previously Blisteze), and a stylus.
The sections are the same as what they’ve always been inside Scrivener, they’ve just been inside what Scrivener calls the binder, and the colour-coding is also mine. But if you want to find out how Shéa McLeod does this, she has two detailed books on the subject: Write Novels Fast: Writing Faster With Art Journalling and Write Novels Fast: Down and Dirty Draft.
Plot overview
The overall plot overview is at the front of the A5 book with page markers in red. (I’ve used little stickers that fold over the page so I can see at a glance when the book is closed where which pages are.) This is where my vague storyline has gone (one side) and where it will be added to. (In Scrivener, the plot overview gets its own text file that moves down the binder as the story is written.)
It also includes a page (one side) of world-bulding notes, such as landmarks and places of interest, both to the reader and to the characters. (In Scrivener, this goes in the ‘Places’ section of the binder.) At the end of this plot overview section, still marked red, is a page (one side) for miscellaneous, also known as bits I missed earlier or ran out of room for.
Character notes
The character notes are next, page-marked green. Character notes include basic questionnaires as well as background and personality notes. Each of the four main characters has a double-page spread. The victim and the suspects all get half a side each. This is where I’ll glue in any pictures too. So far I only have notes for Stevie Beck and some of the questionnaire questions for Maddy, Fal and Vicky (the latter of whose first name just changed as I was writing this…).
There’s a double-page spread for the supporting cast and other recurring characters. Then there’s just one side for minor or walk-on characters. The character section is completed with my A to Z of character names on two sides. The A to Z includes first names and surnames. All of these are page-marked green. (In Scrivener, all of this goes in the ‘Characters’ section of the binder, and each character gets an index card as well as the questionnaire template sheet.)
Plotting section
The next part of the planning book is the detailed plotting section, which is page-marked blue. The first two pages, a double-page spread, is the basic outline for Parts 1, 2, 3 and 4, including the midpoint and the 15 beats from Save the Cat Writes a Novel by Jessica Brody.
The parts can also be called Act 1, Act 2 Part 1, Act 2 Part 2, and Act 3, with the midpoint at the end of Act 2 Part 1. But I like to work in Parts and always have done in Scrivener too. (When I do this in Scrivener, this information is transferred to the index cards for each Part in the binder, which I’ve already created in a template I use, and each Part has individual text files for each Chapter in that Part.)
I’ve split the double-page spread into four and allowed two lines for each beat. Some of these have already been completed but most of them are still currently blank.
The next double-page spread, also page-marked blue, is the chapter-by-chapter overview, over 42 lines, one line per chapter, including a prologue (opening image) and an epilogue (closing image). I already have three lines filled in – the prologue, Chapter 1, and the epilogue.
Over the page is where the detailed chapter-by-chapter breakdown starts, still blue, with a double-page spread for each chapter, prologue or epilogue. That’s currently 42 double-page spreads. As I complete a line on the chapter-by-chapter overview double-page spread (dps), I’ll also add it to the first line of the individual chapter breakdown dps. (In Scrivener, text files are created for each chapter and the detailed outline or synopsis is added to the index file for each chapter and then copied & pasted into the body of the file so that I always have it in front of me.)
Rewrites & edits
The last section of the planning book is for rewrites (page-marked orange) and edits (page-marked yellow, but not until I’ve started the editing process). The rewrites will be as things occur to me as I write the first draft to include in the next draft. The edits will be once the rewrites have been done and the book has come back from beta readers or publishers. I don’t know yet how many pages the rewrites section will be, so I’ll add the yellow page marker when I get there.
Obviously, as I’ve not started to write the story yet (which will be when the A4 book comes into play), I don’t have any rewrites or edits yet either.
Save the Cat beats
I have a few spare pages at the end of my book and I’ve been toying with doing a Save the Cat seminar so I have a better understanding of the various beats and everything else. I’m going to go for it and work backwards from the end of this book as I work through the course. If it works, then for the next book I do this for, I’ll have more of an idea how many pages to allocate at the start of the workbook for this.
The writealong
As is usually the case whenever I do a challenge like this, I’ll be keeping a blog diary and transferring it to a writealong. Once I’d done all of the structure I could do for one morning, I moved on to creating the Word file for this writealong. I copied the last writers’ guide I published (Project Management for Writers: Gate 2) and swapped out each of the chapters for a basic layout of:
- chapter heading
- chapter subheading
- body text blah blah blah
- exercise section blah blah blah
I copied the pertinent part of yesterday’s blog section over, but left the exercise section as ‘blah blah blah’ for now. I created images for the gallery and book image I also posted yesterday. And I wrote the introduction.
All of that took up the entire morning and some of the afternoon, but it will save so much time in the long run.
Sign up for my newsletter
If you would like to receive my newsletter, please follow this link or use the form below to sign up and receive your first free short story.
And don’t forget, you can unsubscribe at any time.


What a wonderful explanation on how you set it up. Comparing/contrasting to how it works in Scrivener also helped me understand the binder functions better, too, thank you!
I hope it made sense…
Once I reimagined the Scrivener binder as a tabbed notebook or a folder with dividers in, I understood it a lot better. Explaining it, of course, is another matter entirely.